Tissue Clearing
Overview
The University Imaging Centers integrates state-of-the-art tissue clearing methods and technologies to help investigators prepare, image, and analyze biologically intact tissues and organs in three dimensions.
The UIC employs multiple tissue clearing approaches while primarily focusing on three: PEGASOS organic-based, and SmartBatch+ & X-CLARITY hydrogel-based methods. SmartBatch+, PEGASOS, and X-CLARITY are compatible with antibody and fluorescence staining, respectively, which allows for a comprehensive analysis of preserved internal structures.
Tissue Clearing Services
Getting Started

To initiate or discuss a project, please submit a service request. UIC clearing team members will reach out to set up a time to discuss your sample preparation, labeling, imaging, and data analysis.
After the initial consultation, UIC staff will provide a link to the UIC Tissue Clearing Service Request Form. A sample submission date will then be agreed upon, and the client will notify the team when sample preparation and fixation occurs. The fixed tissue sample(s) can be dropped off at any of the UIC’s facilities. Depending on the current queue, tissue size, type, labeling requirements, and clearing method, the whole process may take 2-4 weeks. Once completed, UIC clearing staff will reach out to coordinate a time to preview your sample on the microscope in order to confirm labeling, determine the resolution, and ROI for final imaging.
After imaging is completed, the data collected is undergoes processing for visualization and prepared for delivery. Once delivered, your data is ready to be viewed and analyzed. UIC and MSI staff are available to discuss and offer support in your analysis.
Data Volume
Imaging cleared tissue samples generates a large volume of data, is computationally intensive, and requires a system with significant hardware resources to efficiently view and analyze.

This graph illustrates the relationship of how file size and image acquisition time scales for an average intact mouse brain-sized samples post clearing (14 x 18 x 5 mm) taken on the Caliber ID RSG4 Ribbon Scanning Confocal with the SLWD 20X/1.00 NA Glyc objective. The number of channels and the resolution have a significant impact on collection times, data size and subsequent processing and analysis efforts. The numbers on the bars represent the estimated file sizes for raw data in terabytes (TB) on the left axis corresponding to imaging acquisition time measured in days on the right axis. The average data size for an intact mouse brain ranges from 2-4 TB.
Deliverables and Data Delivery
Deliverables
Images
Images, including collections that require denoising or stitching, will be provided in TIFF or Imaris (.ims) format based on researcher preference.
Analysis Results
For most analysis, results are provided as a CSV file. The exact output will be dependent on the projects analysis goals.
Examples:
-
Registration - CSV containing Allen Brain Atlas (mouse brain) region name and IDs
-
Spot counting - CSV containing atlas region name and IDs, and number of detected cells in each region of interest
-
Vessel/tract detection - CSV containing distance statistics to the closest vessel, per region
Data Delivery
The UIC partners with the Minnesota Supercomputing Institute (MSI) to deliver data to UMN researchers. If you are an external researcher that requires an alternative method of delivery, options can be discussed during intake, or by contacting our team at [email protected].
Fore more information on data transfer methods and delivery, visit our Data Transfer & Resources page.
Clearing Methods & Imaging Systems
Clearing Methods
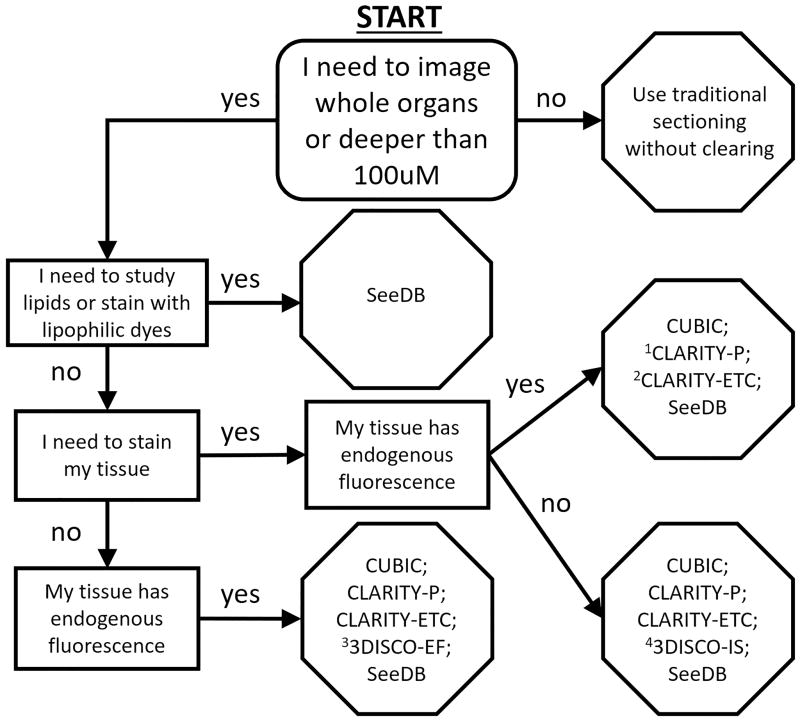
These three methods provide the opportunity to reveal the relationship between the structure and function of molecules of interest in an intact 3D organization for imaging in plant and animal tissues. While there are many other tissue clearing methods, and we are happy to help you pursue those, we have found these methods work well with most biological samples and our imaging systems. We are happy to work with you to determine which system and which probes are right for your studies.
SmartBatch+
The UIC’s SmartBatch+ system combines hydrogel-based tissue clearing and active immunolabeling. Tissue processing for the SmartBatch+ includes an initial step of additional tissue fixation using SHIELD reagents to protect endogenous fluorescence and tissue structure. Following SHIELD fixation and hydrogel matrix formation, the SmartBatch+ uses a rotating electric field to pull SDS micelles through samples, effectively removing the lipids while maintaining tissue dimensions and architecture. Once samples are delipidated, the SmartBatch+ labeling process uses stochastic electrotransport to produce thorough labeling of intact tissue volumes.

This method allows for the use of almost tenfold less antibody than traditional passive staining of whole tissues. Contact the UIC to determine whether your chosen antibodies are validated for use with the SmartBatch+ system.
For samples such as whole mouse brains or similarly sized tissues, the entirety of the clearing and immunolabeling process can take as little as 1.5 weeks with the SmartBatch+. Further, this device is optimized for batch processing with up to 12 mouse brains that can be cleared in a single run. Samples cleared with the SmartBatch+ system are then mounted in a refractive index-matching solution optimized for imaging on the Caliber ID RS-G4 or the 3i CTLS at the UIC.
LifeCanvas Validated SmartBatch+ Antibodies
X-CLARITY
With the X-CLARITY method, the tissues are immobilized within a hydrogel and lipids are removed by electrophoresis in the presence of a detergent. This approach stabilizes the tissue while preserving proteins and nucleic acids throughout with very small, isotropic changes in tissue dimensions. While this method works exceptionally well with endogenous fluorescent proteins, the density of the hydrogel matrix can make antibody labeling of larger samples challenging.
PEGASOS
Compared to other organic-based methods, PEGASOS is capable of antibody labeling while preserving endogenous fluorescence. The PEGASOS method employs organic solvents to solubilize lipids and render tissues transparent once in refractive index matching reagents. PEGASOS is our method of choice for projects in which post-fixation dye, staining and/or immunolabeling is required. This method preserves endogenous fluorescent protein signals for extended times as well and optimally creates a uniform refractive index required for light-sheet imaging.
Imaging Systems
Additional Resources
Publications
Clearing for Deep Tissue Imaging
Authors: Michael Muntifering , Daniel Castranova , Gregory A Gibson , Evan Meyer , Matthew Kofron , Alan M Watson
Clarifying Tissue Clearing
Authors: Douglas S Richardson and Jeff W. Lichtman
Tissue Clearing
Authors: Douglas S Richardson, Webster Guan, Katsuhiko Matsumoto, Chenchen Pan, Kwanghun Chung, Ali Ertürk, Hiroki R Ueda, Jeff W Lichtman
Tutorial: practical considerations for tissue clearing and imaging
Authors: Kurt R. Weiss, Fabian F Voigt, Douglas P. Shepherd & Jan Huisken
Fixation and Sample Preparation for Submission
Perfuse mice transcardially with 1X PBS, then 4% PFA, followed by tissue extraction and immersion in 4% PFA in 1X PBS for 24 h at 4˚C. Tissue(s) should then be washed with 1X PBS and stored in PBS at 4˚C. The PFA should be freshly made from EM grade or better stock.